Imperial Allies
Battle Sector
Authorization Cleared. Entering Battle Records...
This is the sector where we take our armies and beat them to a pulp trying to kill Orks or whatever.
This is the sector where we take our armies and beat them to a pulp trying to kill Orks or whatever.
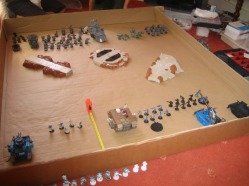
The Battle for Outpost X1 (1100pts)
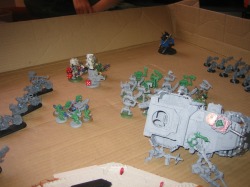
The battle to Outpost X1 was important to the Imperium as it held top-secret blueprints containing information on the prototype Incendium warhead. The blueprints were ordered to be destroyed by the armies of the Imperium at all costs, as it was feared that it had fallen into Eldar hands. If not, the Incendium warhead would finally be developed and be fired at Cadia, and more importantly, the Eye of Terror. The Imperium would end up facing billions upon billions of angry warp spawned Daemons, against which not even the might of the Imperium would prevail. The Regiment of the Raging Tsunamis were sent to defend or destroy this outpost at all costs. However, facing increasingly impossible odds, the Imperial Guard broadcast an SOS. In response to the threat, the Deltamarines redeployed from a clash with Chaos Space Marines and left the battle in the hands of local Regiments. However, still uncleansed, the Deltamarines bore faint signatures of Chaos, and so were accidentally marked by the Raging Tsunamis as a Chaos threat.
The Raging Tsunamis
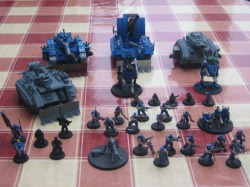
Army List
Company Command Squad with Commissar Snike
Infantry Squad 1
Infantry Squad 2
Chimera
Ratlings
Scout Sentinel
Armoured Sentinel
Leman Russ
Leman Russ Demolisher
Basilisk
Infantry Squad 1
Infantry Squad 2
Chimera
Ratlings
Scout Sentinel
Armoured Sentinel
Leman Russ
Leman Russ Demolisher
Basilisk
Army Choice Analysis
For this battle I knew that I would be facing Eldar and Space Marine forces, so I obviously chose my Leman Russ, my Basilisk and my Leman Russ Demolisher. During the battle, these tanks are supposed to play a key role in getting rid of the infantry, and more powerful vehicles. I was suprised to see that Ben wasn't using his Chapter Master or his Land Raider, instead opting for more troops, so he could capture the outpost more easily. But this would also leave him more open to ordanance barrage attacks, my Guard's speciality. He was however, using Vulkan He'stan, which is incredibly hard to kill. Even if you hit him with an AP1 weapon, you would still have to get past his invulnerable of 3+. Still, one model can't be everywhere on the battlefield. He'stan and his Sternguards were the primary threat, with support from the Dreadnought and the Tactical Squads. The Eldar's main threat could have been many things, although I was particularly worried about his Howling Banshees because they have so many attacks! He also had his Farseer and Warlocks, but I wasn't scared of mindwar because I wasn't using Comissar Yarrick because he costed too many points. He is very powerful though. in a one on one match between yarrick and Ben's Chapter Master, he killed the Master without even taking a single wound! Anyway, I knew John would use mindwar on Hestan, because using it on a company commander would be a waste of a mindwar. I chose the chimera too, but I don't think it would do much with a multilaser, so i used it for what it meant for, troop carrying. So I put squad 2 inside it, with hopes of it setting out towards the objective and capturing it. I played another squad and a command squad for support, and my Ratlings. I don't know why, but they can penetrate a vehicle with an armour of eleven, with the sniper and rending special rules. They can also inflict instant death if I roll a six when rolling to wound. So thats my force and why I chose it.
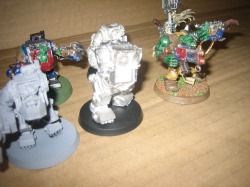
The Deltamarines
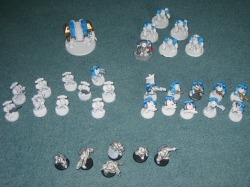
Army List
Vulkan He'stan
Sternguard Veterans
Tactical Squad 1
Tactical Squad 2
Dreadnought
Terminator Squad 1
Sternguard Veterans
Tactical Squad 1
Tactical Squad 2
Dreadnought
Terminator Squad 1
Let's have a look then...
Right. Not a battle I'd been too willing to participate in, as Matt's extensive use of tanks and my lack of points to take Heavy Support I knew that I was in for a tough time. My best chance is to max out on infantry, best for dealing with John's swift moving Eldar and to contest the objective. However, I knew that this would put me in danger of the Imperial Guard's low AP weapons. To combat the tanks (and John's Wave Serpent) I needed some hard hitters, so the Terminators and Dreadnought were draughted in. I was going to take a Whirlwind to take advantage of the high armour saves of the Eldar and Guardsmen, but I knew that Matt would try to max out on vehicles and minimise use of Infantry, and the Whirlwinds low armour and destructive potential would make it a primary target. So out with that idea, and in with as much plasma and melta weaponry as I could find. So, supposing that I weather Matt's first volley, I might be able to use his lack of strong Infantry to come up from behind with the Victory Points from the objective.
Eldar Army List
Farseer: Fortune, doom, mind war. Spirit stones = 150
3 warlocks: conceal, destructor, enhance = 115
10 dire avengers. Exarch with shimersheild + diresword + bladestorm = 167.
5 dire avengers. Exarch with 2 avenger shruiken catapults +bladestorm = 92
10 guardians Eldar missile launcher = 100
5 Warp spiders. Exarch with 2 deathspinners and powerblades = 137
6 Howling banshees Exarch with executioner and war cry = 123
1 war walker with scatter laser, shruiken cannon = 50
1 wave serpent, twin linked starcannons = 135
Total points = 1069
For this battle, i knew I had but a slim chance at winning, I only hoped I could go down fighting. I didn't know what either army would be fielding, but I knew I stood no chance against the imperials tanks. I really needed some fire prisms to deal with the threat of the enemy. The Farseer and warlocks were an obvious choice, but with 3 large blasts a turn, I was worried about my main troops and elites. I decided to target the marines closest to me for a large part of the match. I decided to field the banshees in a wave serpent, as this would allow me to get into combat much quicker. With my Dire Avengers I planned on using bladestorm a lot, and hoped that Matt's tanks would not target them. With my guardians, I hoped to be able to get some lucky penetrating tanks hits, but with a low BS this would be hard. I decided to Deep Strike my Warp Spiders in to hopefully get some quick kills on enemy guard. My main hope for the battle was too take down as many units as possible and still survive. I feel with some heavier weaponry, I would have been able to take down more units and Matt's tanks.
Next unit, definitely fire prisms, hopefully 3.
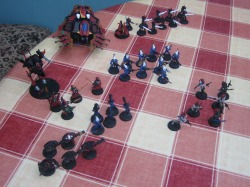
The Official Report...
Matt deployed first, setting up conservatively with his tanks at the back and one infantry squad in his Chimera. The Deltamarines deployed next, spreading out Tactical Squads and keeping the Dreadnought in cover and the Terminators in Reserve. John then set up his troops in a wide spread, keeping his Howling Banshees in their Wave Serpent next to the Space Marines, leaving no doubt to his target for their assault. Matt started off by blasting his new demolisher cannon at the Eldar Guardians, killing nine. The Leman Russ’ Battle Cannon then destroyed the five strong squad of Dire Avengers, scoring Matt his first 92 Victory Points. Then the Basilisk launched, but scattered wide and only killed two Space Marines from Tactical Squad 1. The Chimera’s Multilaser killed another Marine, but then the Plasma Gun in the Command Squad misfired and killed its user. Ben then advanced his Tactical Squads towards the objective and Matt’s left flank. The Sternguard Veterans flanked John and the Dreadnought moved within firing range of Matt’s Tanks. The Dreadnought then fired it’s multi-melta and immobilised the Chimera, stopping Matt’s infantry from getting close to the objective quickly. John’s Eldar started by moving the Wave Serpent into Assault Range of Tactical Squad 2. His remaining Dire Avengers fired a shuriken volley and inflicted 8 wounds on the marines, but their power armour prevented them from taking any casualties. Matt’s next move saw his Scout Sentinel outflank John’s remaining Guardian, and destroyed it, along with the Eldar Missile Launcher, with it’s multilaser. The Leman Russ launched it’s hunter-killer missile which locked onto the Dreadnought, shaking the crew, and stopping Ben from getting within melta range of Matt’s tanks for another turn. The Heavy Weapons team then fired it’s lascannon and stunned the Dreadnought, making sure it was useless in the Space Marine’s next turn. The Chimera then blasted two Tactical Marines with it’s multilaser, however this particular weapon would soon be put out of action. The Demolisher Destroyed another three Aspect Warriors, but the Basilisk was not as much on target when it aimed for the Wave Serpent, and not for the last time this battle it scattered wide and completely missed. The Deltamarines advanced and then Tactical Squad 1 blew off the Chimera’s multilaser with a well placed Krak Missile. The Eldar then Deep-Striked their Warp Spiders into the middle of the battlefield, killing the entire Company Command Squad, before warp jumping behind the objective, and out of sight of the Imperial Guard’s guns. The Eldar’s counter-attack was fiercer still as his howling banshees promptly jumper from back of the Wave Serpent and with their fleet rule they engaged Tactical Squad 2 in combat. The Banshee’s Exarch failed to hit anything and the Sergeant promptly killed a Banshee in response. The Eldar took revenge for the death of their comrade and struck down two Marines with their power weapons, despite having 15 attacks. John’s last few Dire Avengers raced across their Deployment Zone and embarked into the Wave Serpent. The Farseer and Warlocks attacked the Raging Tsunami’s Scout Sentinel and exploded it. They then consolidated towards Vulkan He’stan, hoping to kill him with Mindwar. The Raging Tsunamis enlisted back-up in the form of the Armoured Sentinel with outflanked the first squad of Tactical Marines and melted two of them with a blast from it’s plasma cannon. The first infantry squad fired its artillery piece again but it recoiled and missed the Dreadnought. The guardsmen fired a massed volley and a lucky lasbolt felled another Space Marine! Get your armour checked in future! Then to add insult to injury, the Basilisk blew apart the remaining three Space Marines, destroying a meltagun and 50% of Ben’s Troops. The Ratlings manoeuvred between the Chimera and the Basilisk and Guardsman Squad 2 disembarked from behind the transport. An on target Demolisher Shell instantly killed the Farseer and took a Warlock as well. The Leman Russ then fired on the Wave Serpent but failed to penetrate its armour. Sorely weakened, the Deltamarines called down their last elites, a squad of six Terminators. They Deep-Striked in range of the Guardsman Squad 1 in hopes of shooting them in a hail of Storm Bolter fire but scattered back towards Ben’s lines. However, this didn’t stop them from killing two guardsmen, and it put them in position to counter-attack the Armoured Sentinel. Vulkan He’stan and his Sternguard Veterans joined the failing assault against the Howling Banshees to strengthen the counter-attack against the Eldar’s high initiative. Vulkan He’stan cut apart four Banshees, before the power fist equipped Sternguard Veteran finished off the Exarch, though at the cost of three more Space Marines. The Eldar attempted to hang onto life by disembarking the Dire Avengers from the Wave Serpent and then firing its turret mounted Star Cannon, reducing Tactical Squad 2’s numbers to three. The Avengers then fired, but either missed of failed to wound the Battle Hardened Space Marines. The Warwalker arrived from reserve and out flanked behind the Chimera and attempted to blast the rear armour of the Leman Russ, but failed. The Armoured Sentinel fired its plasma cannon, which blew apart three Terminators (being inside Tactical Dreadnought armour won’t save you from everything!). The Leman Russ Demolisher scored another kill on the squad of warlocks and the Leman Russ killed five Dire Avengers, leaving only two left. The Basilisk and the lascannon from Infantry Squad 1 shook the Dreadnought and severely damaged the multi-melta, putting it out of use for the remainder of the battle. The Ratlings and Guardsmen from Infantry Squad 2 tried to destroy the Warwalker but couldn’t deal anything better than shaking its crew. The Sternguard Veterans moved up behind the Warp Spiders and Tactical Squad two destroyed the last two Dire Avengers, making sure John couldn’t seize the objective. The Terminators continued their assault on the Armoured Sentinel but no damage was done to either side. The Eldar hunkered down and fired the Star Cannon at the Tactical Marines, but all the shots missed despite being twin-linked. The Ratlings had more luck in the next turnas they finally scored a 6 for rending and penetrated he Warwalker, wrecking it. The Demolisher and the Leman Russ targeted the Dreadnought and immobilised it. The Basilisk made a desperate shot at the Tactical Marines to stop them from claiming the objective, but it scattered onto the roof of the Outpost and missed. The Tactical Marines withdrew towards the objective and the Sternguards and He’stan then annihilated the Warp Spiders, despite calling an unofficial pact with the Eldar against Matt! The Terminators finally succeeded in blowing up the Armoured Sentinel, taking no damage. John then killed a Tactical Marine with his star cannon. Matt’s final move saw him blow up the dreadnought with the Leman Russ, and the Basilisk fired on the Tactical Marines, as killing them would win the Imperial Guard the game. However, it scattered (again) and only killed one Marine. In desperation to claim the win, the Terminators charged Infantry Squad 1, killing four, but it wasn’t enough to claim victory, as the squad was fearless because of its Vox Caster. He’stan and the Sternguard Veterans then Sprinted across the battlefield to assault the Wave Serpent. It blew up, killing a Veteran in the blast, but as long as the Tactical Marine held the Outpost the game would draw. We rolled a two for the final turn and the game ended.
Ben 817 Matt 817 John 85
Ben 817 Matt 817 John 85
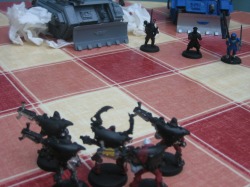
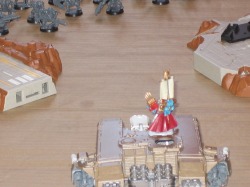
The Howling Banshees assault Tactical Squad 2.
The remains of Tactical Squad 1 after a Basilisk strike.
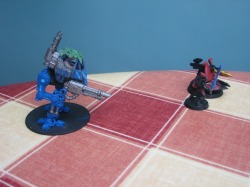
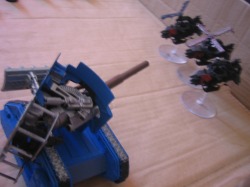
The Scout Sentinel finishes off the last Guardian.
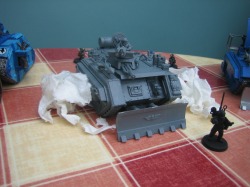
The Chimera gets Immobilised.
The Warp Spiders Deep-Strike in and aim at the Command Squad.

The Farseer and Warlocks assault the Scout Sentinel and destroy it.

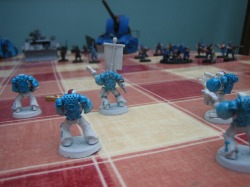
Matt after he 'removes' nine Guardians from the game in one shot, and John picks them all up.
Matt
Wow, what a battle. The game started well, after I blew up nine Guardians and a squad of five Dire Avengers. My Demolisher was right on target and my Leman Russ was good too; I couldn’t have won the game without them. Which is more than I can say about the Basilisk. It defied logic and scattered every turn it fired. Commissar Snike will be heading to the Basilisk artillery barracks shortly after the all clear. My Chimera still proved useful after having its tracks blown off, which is something to keep in mind for the future. My Ratlings killed a War Walker. I killed all the Eldar with ease, but the Space Marines were not so simple. Tactical Squad 1 took a lot of beating from lots of different things before finally perishing at the might of the Imperium. The Dreadnought was shaken and stunned so many times it must have been covered in plasma and gunpowder, and then it finally went up in flames, much to my delight. After apologies from Commissar Yarrick, He’stan and the remaining Terminators and Veterans left without a word, and concentrated Artillery fire finally destroyed the plans and the Outpost altogether. News had just reached the Tsunamis that there were more than one set of plans. Yarrick knew what they needed. Vicious, brutal and inspiring warriors to lead them into battle. Before the whole regiment, the order was issued. We are going to take a trip to the Palaces of the Ecclesiarchy!
Ben
Good Lord of the Imperium, that was a close battle. However, I reckon that one more turn and it would have been over for me. Tactical Squad 1 let me down by dying in around the third turn, so from then on Matt's lines were almost completely safe. In fact, the only threats he had to deal with was the Terminators and Warp Spiders, the only Deep Striking units in the game. My Dreadnought could have played a bigger part in the battle, however a combination of Crew Shaken, Stunned, multi-melta destroyed and Immobilised meant that it never got anywhere near the target. And then it blew up, giving Matt enough points to draw. Curses, I need more tanks. Actually, I almost had a shortage of Infantry as well, as I only had one Troop model by the end of the game. Luckily we agreed that the Outpost could be used as a Bastion, so the lone marine could have survived the hail of fire that would have been aimed at him if we played another turn. Matt knew that he would win as long as I didn't have the Objective, but the game would have been mine if the Dreadnought hadn't died in the last Imperial Guard shot of the game. Actually, I expected the game to be harder as my army was so spread out, but the others were so content with blowing each other to pieces that I was the only one to ever contest it. Ok, the Warp Spiders contested it but they couldn't claim it and they got wipes out in the next turn anyway. Despite being promoted from Company Commander to Commissar, Snike will never be respected in the same way by my Battle Brothers.
John
Right then, the battle. I took a bashing, and i know it. Unfortunately a lack of heavy support, and getting the last turn was what would eventually destroy me. I knew that I wouldn not be able to win, and with Matt getting 3 large blasts a turn, my troops were going down easy. I tried to take down as many enemy units as possible and survive for at least till the end of the game, but I had a whole squad of Guardians(which I will be replacing with Jetbike Guardians as soon as possible) taken down to 1 man in the first turn, and had a full DA squad wiped out first turn. The Craftworld Eldar though, lead by Farseer Ulthsasesh, will return though, and they will have more heavy support, and more troops to deal with those pesky Deltamarines. John Out
Assault for the Cloned Plans (2100pts)
Not long after the Eldar had been thwarted from their campaign to find plans for the Incendium warhead, a new threat emerged. An anonymous Astropathical message had laid claim to the infamous Ghazghkull Thraka owning cloned plans to the warhead. As risking Ghazghkull attempting his fourth all out assault on Armageddon was out of the question, the Deltamarines and Raging Tsunamis were dispatched to track down Ghazghkull’s Space Hulk and get the plans back, preferably killing Ghazghkull in the process. After an arduous fight through the Space Hulk’s corridors, the Imperium’s Strike Team reached the Cargo Hold where three Imperial Tanks were waiting to rendezvous. However, the Cargo Hold was so large that it was impossible to destroy all of the bugs and security systems inside, so within minutes the Ork Horde was upon them…
Due to the nature of the fact that Ghazghkull has so many Orks willing to protect him blast weapons may only target him it they are Barrage or have a line of sight with no Ork in the way.
The battle will be won by the Orks unless the Imperium can kill Ghazghkull, laying him on his side, and then claim him as an objective. If an Imperial model (not tank) is in base contact with Ghazghkull and he is dead at the end of the game, the Imperium wins.
The Imperium
Space Marines (Deltamarines)
Chapter Master
Tactical Squad 1
Sternguard Veterans
Terminators
Land Raider
Tactical Squad 1
Sternguard Veterans
Terminators
Land Raider
I’ve been looking forward to this battle for a long while now because of its sheer size and originality. Having made the Imperium’s victory conditions myself, I knew that this wouldn’t be easy for us to win. It was bad enough having to kill Ghazghkull anyway, but then we had to forge our way through the Ork Horde to claim his dead body as an objective. To make it harder, we also couldn’t target Ghazghkull with a normal blast weapon if there was an Ork model in the way. (This represented the fact that there was just so many Orks protecting Ghazghkull. The nature of the mission (should we actually complete the first objective of killing Ghazghkull) was to charge in and capture him. So, being a Space Marine player, I chose the Spearhead of any armoured assault, the Land Raider. With straight 14s all round it would take the warboss and meganobz themselves to actually destroy it. And if they managed to, well, my Chapter Master and Tactical Squad are inside ready to dish out some punishment should the need arise. The Battle Plan : Matt provides covering fire for me while I charge into the Ork lines and hope I don’t die before Ghazghkull does.
Imperial Guard (Raging Tsunamis)
Commissar Yarrick
Guardsman Squad 1
Guardsman Squad 2
Guardsman Squad 3
Ratlings
Leman Russ
Basilisk
Chimera
Armoured Sentinel
Scout Sentinel
Guardsman Squad 1
Guardsman Squad 2
Guardsman Squad 3
Ratlings
Leman Russ
Basilisk
Chimera
Armoured Sentinel
Scout Sentinel
Incoming message from Commissar Yarrick sir!
Men, the time has come for us all to face an old enemy of mine! Three times we have fought the Orks on Armageddon! Three times I have faced the Ork Prophet in one on one combat! Three times we have repulsed him from this world, and I have pursued him across the galaxy! This time we won't let it happen again! McCant, prepare your soldiers for battle. Annihilate every trace of Ork existence. AND FIND ME GHAZGHKULL THRAKA!
The grudge match of the century. There have been three dead heats when fighting one another. Hopefully Yarrick will win this time and hopefully, mortally wound Gaghzkull. Still, the Space hulk is full of containers and craters. Its a good arena to send some Sentinels and Ratlings in and outflank Ghazghkull and his bodyguards and kill a couple from the Rending rule. I sent in a lot of Infantry because of the Orks huge numbers, but I kept aside my Leman Russ and Basilisk to kill all the Boyz and basically act as fire support, deciding not to take my Demolisher because of its lack of range. My Basilisk Commander had better be on target today after Snike gave him a stern talking to last time. As always, my faithful yet hapless Chimera was sent in again to carry troops and then malfunction and do something stupid. And of course, Commissar Yarrick will be leading my troops from the front line, ready to make Ghazghkull pay for what he did to Hades Hive, and more importantly, Armageddon.
The Orks
Ghazghkull Thraka
Warboss
3 Deffkoptas
3 Deffkoptas
5 Stormboyz and Boss Zagstruck
Warbuggy
Battlewagon
Trukk
25 Boyz
16 Boyz
10 Boyz
6 Nobz
20 ‘ard Boyz
3 Warbikers
5 lootas including mekboy
3 Meganobz
Zzap Gun
Warboss
3 Deffkoptas
3 Deffkoptas
5 Stormboyz and Boss Zagstruck
Warbuggy
Battlewagon
Trukk
25 Boyz
16 Boyz
10 Boyz
6 Nobz
20 ‘ard Boyz
3 Warbikers
5 lootas including mekboy
3 Meganobz
Zzap Gun
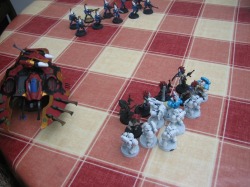
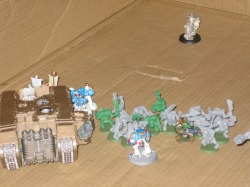
The Assault
The start of the battle didn’t see much in the line of casualties; the Orks went first, played by our brothers Sam and Chris, who charged forward everything in their army and moved the all important squad containing Ghazghkull behind the battlewagon. (Actually, the squad also contained the Warboss and the 3 Meganobz, making it a huge force to contend with.) The Imperium’s first turn saw a lot more casualties, as the Leman Russ stunned the Trukk, and the Basilisk fired on target for once and killed all six Nobz. The Land Raider drove forward and killed two Boyz with its Heavy Bolter. The Orks next turn didn’t see much action either as more Boyz charged down their targets and the Battlewagon tried to destroy the Chimera, but failed to penetrate its armour despite firing the shell. A Big Shoota and Rokkit Launcha were all fired at the Guardsmen but sadly missed. Matt then rolled high for his Armoured Sentinel and it Outflanked behind Ghazghkull, on the right of the board. The Chapter Master and his Tactical Squad disembarked from the Land Raider, and the Basilisk wrecked the Battlewagon, however the Boyz inside didn’t go to ground. The Armoured Sentinel’s Plasma Cannon rolled scatter but Matt rolled a two and a one so it didn’t move, inflicting four wounds on ‘Ghazghkull’s mob.’ Combined firepower from the Land Raider’s Heavy Bolter and the Tactical Squad’s Bolt Pistols killed another four Orks, and they then assaulted, killing another 8 Orks while losing three Marines to power weapon attacks and unlucky armour saves. (Actually, by the end of this battle you’ll probably see that the Space Marine’s rolls really were terrible.) The Ork’s Turn 3 saw a huge difference to what their previous moves had been like and promptly Outflanked both squads of Deffkoptas behind the Imperium’s lines, three on each side. Most of the Ork army charged at the Armoured Sentinel, including Ghazghkull and his mob and the trukk carrying ten Boyz. The Deffkoptas fired off their twin linked rokkits and wrecked the Basilisk, nearly sealing the Imperium’s fate. (Killing a warlord is much harder with no Barrarge Weapons.) Gazghkull called a Waaagh! and assaulted the Armoured Sentinel, Immobilising it and destroying the Hunter Killer. The Armoured Sentinel was the stunned and had its Plasma Cannon blown off. In response to the Ork’s large-scale counter attack, the Imperium rolled high for reserves and Deep-striked the Terminators, and Outflanked the Ratlings behind the Armoured Sentinel and the Scout Sentinel on the Ork’s left flank. The Terminators Scattered off from their target of Ghazghkull but still managed to completely obliterate the Zzap gun’s crew with Storm Bolter Shells. All six of the Deffkoptas were destroyed as the Guardsman, Leman Russ and Sternguard Veterans all concentrated their fire to avenge the Basilisk in one impressive display of shooting. The Chimera brought low another boy with its Multilaser and Commissar Yarrick shot another one. The Trukk was exploded with the Kaboom! result on the ramshackle table by a Multilaser shot from the Scout Sentinel. The boyz inside went to ground but then fell back after losing four Orks from the explosion. The Chapter Master and Tactical Squad now at half strength finally made that last boy fall back and consolidated back towards the door of the Land Raider. The Ork’s next turn looked to be as promising as the last as the Stormboyz rolled in for reserve but they scattered off table and then died in a terrible accident. The Meganobz wipe out the threat from the Ratlings with their kombi-skorchas, and a terminator dies from a slugga volley. (Told you the Marine’s rolls were bad.) Some boyz continue to fall back off the board so they die. The Loota’s Deffguns drop another Terminator much to Ben’s dismay and the Boys then assault them, permanently insuring that they don’t get to their target in the battle. Ghazghkull’s mob then succeeded in blowing up the Armoured Sentinel, little by little destroying the heavy hitters in the strike force. The Chapter Master embarked the Land Raider, which moved at Combat Speed towards the Lootas. The Chimera and Yarrick produced an impressive display of shooting by missing all of their rolls and the Chapter Master was obliged to better that by scattering his Orbital Bombardment so wide it missed everything. (Including Ghazghkull. Again.) The Leman Russ had better luck killing nine boyz with the battle cannon, and a lasvolley from Guardsman Squad 2 killed another two. The Lootas are finally killed by the Scout Sentinel which was adding up quite an impressive kill tally, despite the Land Raider missing all of the Lootas. The Terminators kill two boyz in assault and lose another Marine to bad armour saves. However, the Boyz’ mob rule kept them fearless. In turn 5, the tide started to turn in the Imperium’s favour. The last Nob departed the board from falling back out of a boy squad and Ghazghkull moved south towards the Guardsmen. The Buggy’s Big Shoota missed the Sternguard Veterans and Slugga rounds failed to wound Yarrick. The Assault against the Terminators ends in a 0-0 stalemate. The Land Raider did what it was built to do by putting the Imperial Commander’s final Battle Plan into action. It charged forward into the Gretchin who promptly fell back off the table edge, and continued forward into the warbikers, who fell back too! Yarrick used the Move Move Move order on two squads so they moved closer to Ghazghkull in the movement phase, and Yarrick shoots all but three boyz and a Nob. The Land Raider’s lascannon blasted to smithereens a Meganob and the Chapter Master disembarked, ready to Do-or-Die. The Chapter Master’s Combi-Melta failed to wound with the melta part and then the Squad’s Meltagun missed. However, a good shot from the Sergeant’s Plasma Pistol killed another Meganob. The Chimera’s Multilaser killed another two Orks, Yarrick killed another one and the Chimera’s Heavy Bolter killed the last Ork, a Nob. Combined lasvolleys from Infantry Squads 2 and 3 ended the lives of the last Meganob and the Warboss. The Leman Russ Immobilised the warbuggy with its Lascannon and the Chimera’s hunter killer wounded Ghazghkull. The last Terminator was having a hard time in assault as all five of his teammates had been killed in assault, or by sluggas and a Kustom Mega Blasta shot, so he only killed one boy. Ghazghkull moves closer towards the Guardsmen in Turn 6, and the Warbuggy failed to fix itself with its Grot Riggers. Ghazghkull kills a Guardsman with his Big Shoota and the last Terminator still hangs onto survival in assault. Yarrick moved forwards to switch squads and Guardsman Squad 1 disembarked from the Chimera. The Chimera then tried to Tank Shock Ghazghkull as we agreed that if he was falling back at the end the Imperium would win, as long as he had left the table. However, Ghazghkull passed his Leadership Test and opted for Death or Glory, Penetrating the Chimera, so it was up to Matt’s damage roll to see what would happen next. Sadly, the Chimera exploded, and Ghazghkull took no wounds from the explosion. The Tactical Squad’s Meltagun, Plasma Pistol and Plasma Cannon all reduced Ghazghkull to one wound, but then bolter squads from the rest of the squad failed to get past his mega armour. However, just when it looked like the Imperium would lose, Ben remembered his Land Raider, which fired the Lascannon and killed Ghazghkull! Yarrick then issued move move move to his squad, Guardsman Squad 2, and then they ran 1” to claim Ghazghkull’s body. The terminator still failed to die in assault but knocked off another Ork. The Warbuggy failed to fix itself in the last turn abd the Terminator still didn’t die, but killed three Orks. The Chapter Master got into the Land Raider and the Leman Russ destroyed the Warbuggy’s Big Shoota with its Lascannon. The Scout Sentinel’s Multilaser failed to penetrate the Warbuggy’s armour, however the Leman Russ’ Pintle Mounted Heavy Bolters Stunned it. Finally, the Sternguard Veterans got to see some action and assaulted the Warbuggy, and the Sergeant scored three penetrating hits that wrecked it. The lone Terminator in assault still didn’t die but killed another two boyz.
Imperium : WIN Orks : LOSE
Imperium : WIN Orks : LOSE
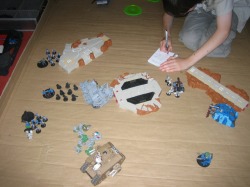
Deployment
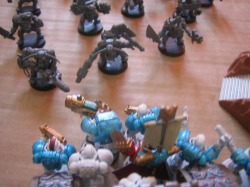
Ghazghkull's Mob
The Land Raider faces the oncoming Ork Horde at a bottle neck
The Chapter Master Assaults
The Battlewagon gets wrecked and the Boyz charge the Armoured Sentinel
The Deffkoptas take out the Basilisk
The lone terminator in assault and converging on Ghazghkull Thraka
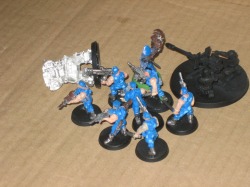
Guardsman Squad 2 with Yarrick claim the plans
Ben takes score at the end of the battle
Ben
That was a well exciting battle. Though from the start Matt was badgering me about the mission being too hard to accomplish, we actually won. Just. That was one of the closest battles that I have ever fought, though not quite as close as the Battle for Outpost X1. Matt’s Orders that he could issue proved invaluable; in fact if it hadn’t been for them then I doubt we would have won. It was totally luck of the draw- if the game had ended on turn five Ghazghkull wouldn’t have taken a single wound, but luck held out. Actually, our battle plan had to change several times as Ghazghkull wouldn’t stand still, despite the Meganobz Slow and Purposeful rule. (They kept rolling high!) In the end, it came to a last ditch attempt to wound Ghazghkull, as our original plan had changed to Tank Shock him off the board, which went up in flames, (literally) and then to shoot everything and hope he fails his saves. He called a Waaagh! in turn three, which meant his 2+, was invulnerably and then charged down Matt’s Armoured Sentinel. That was how badly the battle went until turn five where my Land Raider pushed through. Had it not, however, then I would be writing something very different here…
Matt
Well done men. You will be awarded greatly as Heroes of Armageddon and Saviours of Cadia. You will all be remembered forever as some of the greatest soldiers the Imperium has ever known. I salute you all.
Ghazghkull's personal mob was the one that was between the plans and us. Two squads of Leman Russ exterminators and Yarrick’s own personal Baneblade (The Fortress Of Arrogance) pursued the other two mobs around the cargo hold. His Mob was a particularly tough one, as he had appointed Boss Zagstruk to do his bidding. fortunately for us, Zaggy scattered wide and flew out of the Arena. He appeared, without the rest of his Stormboyz, on the Ship deck. it would take him hours to run back to the cargo hold, by which time the battle was all but over. We didn't scratch Ghazghkull until the sixth turn, instead resolving the wounds on his Warboss and Meganobz bodyguard's. My Leman Russ was unfortunately on the wrong side of the Battlefield to do any real damage. My Basilisk was impressive, killing six Nobz and a Battlewagon before somehow overturning after a Deffkopta's rokkit launcha hit an important fuel cell. My armoured Sentinel dealt four wounds to Ghazghkull’s squad, unfortunately not harming Ghazghkull, before exploding after Ghazghkull hit its leg and crippled it. My Ratlings did the same, coming in, taking a pot shot at Ghazghkull, then getting killed by him and his retinue. My Chimera did its job again, carrying troops into battle before tank shocking Ghazghkull but blowing up after a successful death or glory attempt. Even my Guardsmen killed their fair share of Greenskins. But it was Yarrick who symbolically plucked the plans from Ghazghkull's body.
Ghazghkull's personal mob was the one that was between the plans and us. Two squads of Leman Russ exterminators and Yarrick’s own personal Baneblade (The Fortress Of Arrogance) pursued the other two mobs around the cargo hold. His Mob was a particularly tough one, as he had appointed Boss Zagstruk to do his bidding. fortunately for us, Zaggy scattered wide and flew out of the Arena. He appeared, without the rest of his Stormboyz, on the Ship deck. it would take him hours to run back to the cargo hold, by which time the battle was all but over. We didn't scratch Ghazghkull until the sixth turn, instead resolving the wounds on his Warboss and Meganobz bodyguard's. My Leman Russ was unfortunately on the wrong side of the Battlefield to do any real damage. My Basilisk was impressive, killing six Nobz and a Battlewagon before somehow overturning after a Deffkopta's rokkit launcha hit an important fuel cell. My armoured Sentinel dealt four wounds to Ghazghkull’s squad, unfortunately not harming Ghazghkull, before exploding after Ghazghkull hit its leg and crippled it. My Ratlings did the same, coming in, taking a pot shot at Ghazghkull, then getting killed by him and his retinue. My Chimera did its job again, carrying troops into battle before tank shocking Ghazghkull but blowing up after a successful death or glory attempt. Even my Guardsmen killed their fair share of Greenskins. But it was Yarrick who symbolically plucked the plans from Ghazghkull's body.
